Craigslist Colonial Dressers: Part 1
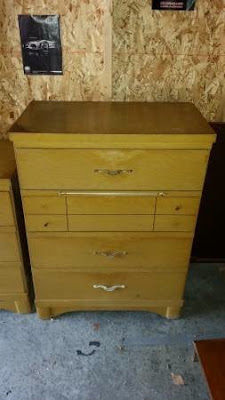
Remember these yellow, cheap Colonial style dressers I nabbed off of Craigslist in last week's post?
Well, the shorter & wider of the two has been under construction all week! Lots of discoveries about these two dressers in this escapade the past 3 or 4 days, and a lot of trial and error. But one is almost done & in place in the Guest/TV room, and I couldn't be happier with how it's turning out so far.
We packed the dresser up on Wednesday to bring it to the house, and ever since it hasn't had a day to itself.
There have been a few moments where I thought I might have to change the design on these, but overall, I'm happy with how this one is going.
This is a 6 drawer dresser, not a 9 drawer dresser. What? I thought for sure that this was a 9 drawer, but I was pleasantly surprised to find out that it had 3 small drawers, and 3 larger drawers. That's much better than all those tiny drawers!!
But it also makes the knob situation kind of weird. For the right hand drawers, you have one horizontal pull, and two knobs instead of just knobs, or just pulls. Strange....
But then I also realized... I can't even fake like it has 9 drawers once they're painted because there aren't grooves where those "separation lines" are. Those are literally just lines on the face of the wood. Alright then...? Maybe there will have to be a detail addition to keep up the facade. Some framing, perhaps?
Then, all of the hardware is a pain in the butt. The screws to keep the pulls in are just short enough to sometimes wiggle their way free, they're filthy gross, and the front plates are three separate pieces each. And they all have to be taken out for the frame to be painted. Yay.
Also, the bottom piece that is split in half needs some serious TLC. It's completely detached and swings around like a dangerous weapon if you're not careful. Grabbing the staple gun and nails as we speak. We cannot have that happening. No way.
Okay. Now that we've figured out all of the bad, let's check out the good, eh?
This thing is super lightweight! And I mean "how in the world is this a dresser and not an end table" kind of light. If it weren't for the weird turn in our staircase, I totally would have been able to drag this thing upstairs by myself. But alas, our staircase is super awkward. Enter superhero Allie to the rescue to help me get it all situated.
She knows how I move & operate, so there were no Ross Geller moments needed. Phew!

Then it came for some cleaning, some quick sanding to get rid of any built up yuck, and a few coats of paint.
I cleaned the hardware using some acetone (worked wonders) and then gave it a few coats of Rustoleum to update it. Now I have no need to buy new pulls, just some knobs! Saving money is always great, right?
So the dresser is on its way! I've tried several different ways to bring interest to this plain dresser.
First I tried distressing it. But that just made it look dirty & grundgy, and that wasn't a look I wanted.
Then I tried stenciling. Nope, that won't work either; there isn't any good place to put anything, and an all over design would just be too much.
But I think I may have finally figured out what to do to these drawers to bring a little extra "umph" their way. Check them out in the reveal in an upcoming post!
Well, the shorter & wider of the two has been under construction all week! Lots of discoveries about these two dressers in this escapade the past 3 or 4 days, and a lot of trial and error. But one is almost done & in place in the Guest/TV room, and I couldn't be happier with how it's turning out so far.
We packed the dresser up on Wednesday to bring it to the house, and ever since it hasn't had a day to itself.
There have been a few moments where I thought I might have to change the design on these, but overall, I'm happy with how this one is going.
This is a 6 drawer dresser, not a 9 drawer dresser. What? I thought for sure that this was a 9 drawer, but I was pleasantly surprised to find out that it had 3 small drawers, and 3 larger drawers. That's much better than all those tiny drawers!!
But it also makes the knob situation kind of weird. For the right hand drawers, you have one horizontal pull, and two knobs instead of just knobs, or just pulls. Strange....
But then I also realized... I can't even fake like it has 9 drawers once they're painted because there aren't grooves where those "separation lines" are. Those are literally just lines on the face of the wood. Alright then...? Maybe there will have to be a detail addition to keep up the facade. Some framing, perhaps?
Okay. Now that we've figured out all of the bad, let's check out the good, eh?
This thing is super lightweight! And I mean "how in the world is this a dresser and not an end table" kind of light. If it weren't for the weird turn in our staircase, I totally would have been able to drag this thing upstairs by myself. But alas, our staircase is super awkward. Enter superhero Allie to the rescue to help me get it all situated.
She knows how I move & operate, so there were no Ross Geller moments needed. Phew!

Then it came for some cleaning, some quick sanding to get rid of any built up yuck, and a few coats of paint.
I cleaned the hardware using some acetone (worked wonders) and then gave it a few coats of Rustoleum to update it. Now I have no need to buy new pulls, just some knobs! Saving money is always great, right?
So the dresser is on its way! I've tried several different ways to bring interest to this plain dresser.
First I tried distressing it. But that just made it look dirty & grundgy, and that wasn't a look I wanted.
Then I tried stenciling. Nope, that won't work either; there isn't any good place to put anything, and an all over design would just be too much.
But I think I may have finally figured out what to do to these drawers to bring a little extra "umph" their way. Check them out in the reveal in an upcoming post!


Comments
Post a Comment