Coffee Table Upcycle
A while back, Chelsea and I picked a beat up coffee table by the side of the road. It was cheaply made, kind of wobbly, and looked like it had suffered some severe water damage to the top.
But that doesn't stop me. Water damage? Eh whatever. It isn't real wood anyways, it's pressed wood, so it'll be crummy anyways. Maybe with a little sanding and creativity, it'll be alright.
Then I remembered a ton of Pinterest posts I had seen recently. Most were for Ikea Lack coffee tables, but it could definitely work for this one, too.
First, I cleaned the table extensively with Clorox. God only knows what this table has seen.
Then I went to Home Depot and spent less than $20 for some new wood planks (cut to size for free), and headed home. I still had the stain originally purchased for the dining room table, and a ton of polyurethane left over, so I had everything else I needed.
I haven't decided on the status of the current legs, either. I am leaning towards hairpin legs.... Something about them just feels right compared to the cheap pressed wood. Especially when this table is paired with my futon in the new guest room, I feel that mid-century style is the way to go.
We'll see where this project goes, but for now, back to the important things in life ;)
But that doesn't stop me. Water damage? Eh whatever. It isn't real wood anyways, it's pressed wood, so it'll be crummy anyways. Maybe with a little sanding and creativity, it'll be alright.
Then I remembered a ton of Pinterest posts I had seen recently. Most were for Ikea Lack coffee tables, but it could definitely work for this one, too.
First, I cleaned the table extensively with Clorox. God only knows what this table has seen.
Then I went to Home Depot and spent less than $20 for some new wood planks (cut to size for free), and headed home. I still had the stain originally purchased for the dining room table, and a ton of polyurethane left over, so I had everything else I needed.
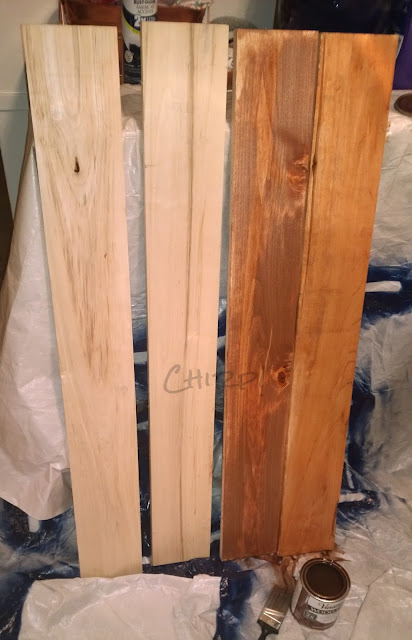
After a few coats of stain, the boards finally had the colors I wanted. I didn't want a flat color across all of the boards, so I put heavier coats on a few of the boards to add some interest.
Here's a naked board next to the first coat of stain. For this project, I used the American Walnut stain I had on hand, but any color would work.
I let the stain dry for several days, as the heavier coats took much longer to cure. I wanted all the stickiness to be gone before I placed them on the table top. After some wood glue and a weighted overnight dry (I filled some laundry baskets with heavy items, and let them sit on the table top over night), the table top looks fantastic!
I have yet to sand the rough edges down, and decide whether or not to poly the top of it. I kind of like the idea of allowing time to wear down the color, as poly typically makes things shinier than they really are. On the other hand, though, I really like the way the top looks right now.
We'll see where this project goes, but for now, back to the important things in life ;)


Comments
Post a Comment