From Cheap to Chic: Bar Cart Update
On one of my many thrifting excursions, I ran across a couple new projects (including yet another dining set). But there was one that I grabbed with an immediate plan in mind.
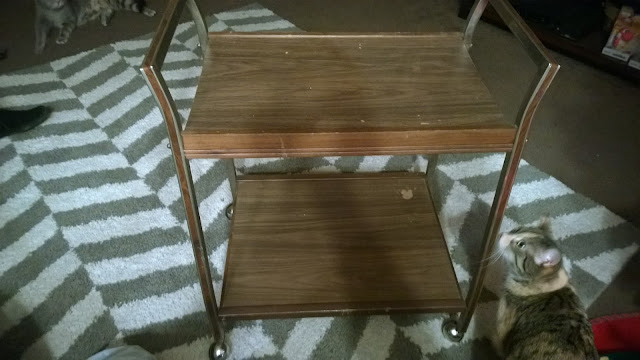
It had a $4.99 price tag, rolled smoother than butter, and was a perfectly awkward height so that I had to bend slightly to drag it around the Salvation Army. And sure, it looked ugly and cheap, but I had an idea.


Do you have any suggestions for filling our decanters? I've looked into it a bit online, and it seems like mostly scotch, whiskey, and bourbon are typically put into the square ones. But I have the two pitcher-style ones that I'm unsure of what to use with.
I did read that a lot of people will put wine in them to "open up" the flavor, which could work to dress up cheap bottles of wine for parties. Might make us feel classier drinking our Arbor Mist ;)

Overall, this $5 cart was well worth it! Using supplies that we already had, I made this dirty old cart into a thing of (almost) beauty!
It had a $4.99 price tag, rolled smoother than butter, and was a perfectly awkward height so that I had to bend slightly to drag it around the Salvation Army. And sure, it looked ugly and cheap, but I had an idea.

The wheels were ugly, the shelves were ugly, the metal was ugly....the whole thing was ugly.


I had some contact paper I had bought a while ago for photos, and some chrome paint from a few other projects, and that was all I was going to need.
I disassembled the entire cart to get full access to the shelves and to make the spray painting easier. I rolled out the contact paper, measured it out using the shelves as templates, and cut out the pieces.


After I cut the pieces out, I covered our table in newspapers, arranged the pieces of the cart over top (aside from the shelves), and spray painted everything chrome.


The difference is amazing. Those ugly brown plastic covers now match the metal and the sections of wood that hold the shelves in.
As the paint dried, I wrapped each shelf in the contact paper. With contact paper, you have to make sure the surface you're adhering the paper to is clean and dry. It also helps to use a flat edge to eliminate any bubbles, such as a credit card or ruler.


Now of course, no one is going to be fooled and think that these shelves are made of marble- but man, it can be nice to pretend sometimes!
They're much too thin to be marble, and the top shelf is bowed from the weight of years past. But it sure did start to look nice when I set it next to the chrome and some glass decanters and pitchers from around the house. I could really start seeing this coming together.


Once it was all put together, it looked really nice! I'm not quite sure what we'll put in these decanters, but they do look pretty stellar against that "marble" shelving!


Now again, no one is going to be fooled about the shelves, but this looks way better than those frumpy old particle board shelves. One last look at before (just to appreciate how much some contact paper and paint can do):

And after (whoo whoo baby):


Comments
Post a Comment