Nightstand Revamp & Wagner Paint Ready Sprayer Review
As many of you know, I've been on the hunt for two matching nightstands to use in our bedroom. For the past 8 months, we've had my made-over bookcase, a Walmart night table & his old 2 shelf bookcase to use as nightstands.
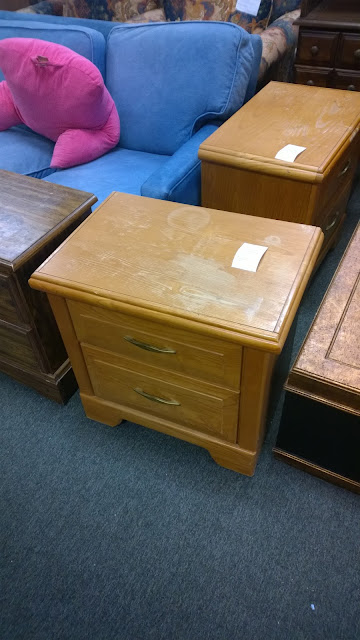
I'm tired of it. I want our bedroom to eventually look put together, and feel like an actual adult room. I thought I had it all figured out with these two nightstands ($2/each at Salvation Army), and this Thomasville dresser ($18 on sale at Salvation Army). Unfortunately, the dresser is entirely too heavy and large to go up our stairs.

We have a turn in our stairs that makes anything over 6 ft long almost impossible to get to the second floor of our house. If you put the dresser on its side so it stands tall, it's too tall & will crack into the ceiling of the living room. And there just isn't anyway to carry a 6.5 ft dresser lengthwise around a 2.5 ft wide turn. So unfortunately, this beauty will have to remain in our living room. Oops (should have measured it first- live and learn).

So while these nightstands won't match the dressers, they'll at least match each other and look nicer than the mess we had.
For this project I decided to test out my new Wagner Paint Ready Sprayer. It was a smaller project, so I thought it'd be a good opportunity. And if it ruined either of the stands, it was a $2 loss for the piece, and a return trip to Amazon for the sprayer. Fairly risk free.

Overall, I am very happy, amazed even, at how well this sprayer works. I finished each of these stands in under 5 minutes, and only used about a pint of paint for the both of them (with some left over for touch-ups).

However, the sprayer does kind of spurt bigger spots of paint onto your piece when it starts to get low. Simply brushing over these spots remedies the issue, but you will no longer have the uniform coat & texture in that spot. As long as you keep your sprayer well filled, you'll be okay. I didn't have much paint, so I couldn't keep it as filled as I'd have liked.
Overall, this was definitely a good investment tool. I can finish projects much faster, and it uses a lot less product (paint) than I would by hand brushing. So not only is it time effective, but cost effective as well.

These nightstands took on a whole new life with a few coats of white paint as well. Looking at them side by side like this blows my mind. It never ceases to amaze me how much of a difference a few coats of paint can make on something.

I have yet to decide if I will update the hardware or not, as I'm not a huge fan of the yellow-ish brass handle pulls on each drawer. But it surprisingly doesn't look too bad, so for the time being, they'll stay this way while I finish deep cleaning the house & figuring out what I'd like to do with some other furniture pieces.

I'm leaving the Thomasville alone for now, as it doesn't look bad in our living room as-is. I have to rearrange the room itself so that it isn't awkwardly placed, but after that, it'll remain untouched by stripper, sanders, or paint for a long while.
In the past year of DIY furniture rehab & makeovers, I've taken some of the ugliest pieces of furniture and made them (at the very least) presentable again. I'm in love with what I do, with the process of what I do, and the results I see from what I do.
My house will very soon be filled with personalized, rehabbed furniture that has a story behind it, and I wouldn't have it any other way. My pieces are all unique because of it, and I am so happy that I discovered this passion to make my house my own, and a reflection of who we are here.
And thank YOU, to everyone that continually reads all these posts, and that support the shop. I truly appreciate each and every one of you!
I'm tired of it. I want our bedroom to eventually look put together, and feel like an actual adult room. I thought I had it all figured out with these two nightstands ($2/each at Salvation Army), and this Thomasville dresser ($18 on sale at Salvation Army). Unfortunately, the dresser is entirely too heavy and large to go up our stairs.


So while these nightstands won't match the dressers, they'll at least match each other and look nicer than the mess we had.
For this project I decided to test out my new Wagner Paint Ready Sprayer. It was a smaller project, so I thought it'd be a good opportunity. And if it ruined either of the stands, it was a $2 loss for the piece, and a return trip to Amazon for the sprayer. Fairly risk free.

Overall, I am very happy, amazed even, at how well this sprayer works. I finished each of these stands in under 5 minutes, and only used about a pint of paint for the both of them (with some left over for touch-ups).

However, the sprayer does kind of spurt bigger spots of paint onto your piece when it starts to get low. Simply brushing over these spots remedies the issue, but you will no longer have the uniform coat & texture in that spot. As long as you keep your sprayer well filled, you'll be okay. I didn't have much paint, so I couldn't keep it as filled as I'd have liked.
Overall, this was definitely a good investment tool. I can finish projects much faster, and it uses a lot less product (paint) than I would by hand brushing. So not only is it time effective, but cost effective as well.

These nightstands took on a whole new life with a few coats of white paint as well. Looking at them side by side like this blows my mind. It never ceases to amaze me how much of a difference a few coats of paint can make on something.

I have yet to decide if I will update the hardware or not, as I'm not a huge fan of the yellow-ish brass handle pulls on each drawer. But it surprisingly doesn't look too bad, so for the time being, they'll stay this way while I finish deep cleaning the house & figuring out what I'd like to do with some other furniture pieces.

I'm leaving the Thomasville alone for now, as it doesn't look bad in our living room as-is. I have to rearrange the room itself so that it isn't awkwardly placed, but after that, it'll remain untouched by stripper, sanders, or paint for a long while.
In the past year of DIY furniture rehab & makeovers, I've taken some of the ugliest pieces of furniture and made them (at the very least) presentable again. I'm in love with what I do, with the process of what I do, and the results I see from what I do.
My house will very soon be filled with personalized, rehabbed furniture that has a story behind it, and I wouldn't have it any other way. My pieces are all unique because of it, and I am so happy that I discovered this passion to make my house my own, and a reflection of who we are here.
And thank YOU, to everyone that continually reads all these posts, and that support the shop. I truly appreciate each and every one of you!


Comments
Post a Comment