Reupholstering a Settee: Part 1- Deconstruction
This is only the first installment of a series. If I put this entire process into one post, it'd be a novel. It just has to be split into several parts, and it won't seem as intimidating.
If you plan on tackling a similar project, for your easy reference, I have created an index:
Part 1- Deconstruction
Part 2- Cleaning and updating the frame
Part 3- Choosing & cutting your new fabric
Part 4- Recovering your piece
As each post becomes available, the above "chapters" will each be a link to that specific post.
So let's dive in, shall we?
About 6 months or so ago, I received this beautiful little settee. It was sturdy, adorable, and the perfect size for a small seating area.
The only problem was that the fabric needed some serious TLC. As in, there was a missing button cap, a strange smear stain on the back, no dust cover, and quite a few damaged sections.

I knew I needed new fabric for it, but it took me forever to
a) decide what color I wanted
b) decide what texture I wanted
c) find a good price point, & finally,
d) have a place for this little cutie other than in the storage unit
Once all of those pieces fell into place...
a) grey, of course
b) linen, to keep the French vibe going
c) JoAnn's coupon to the rescue
d) that Old World Study I've been planning!
...it was just a matter of getting going on the work portion of the project.

So here we go folks. Here's your list of recommended supplies:
- Face mask/safety glasses
I really wish I'd have had these last night, because batting and fluff got everywhere in my nose & mouth, and several tacking nails came flying out at my face. - Tack remover
I used this one from Hancock Fabrics (now out of business). It was great for getting in-between a couple layers & getting under the tacks that the fabric was attached with. - Needle nose pliers
I used these to safely grab the nail heads that were loosened but not fully removed by the tack remover. That way I could safely pull them out without the risk of them flying up into the air, and quite possibly my eye. These ones at JoAnn would have been nice for preventing hand-cramps, but I just used the ones from my tool kit. - Jar or bowl
I used a giant mason jar to keep all the tacks I removed in so they didn't get lost in the carpet - Scissors
Only for the most dire of situations where you can't remove the fabric in one piece. There were several small spots towards the end where I had to cut the fabric in order to remove it because of the way my settee was built. Hopefully you won't need to do this.
Deconstruction
- Take off the dust cover.
That is, if your piece still has it. Simply flip the piece over, and tear it off. You could be easier on it and cut it off along the edges so you can make a new one.
Really the important part of this step is exposing the tacks along the edge of the bottom frame where the fabric is secured.
- Remove any cording.
Typically, cording is only attached by a thin layer of fabric or hot glue, which makes for easy removal. Be sure to keep it in tact as much as possible, you'll be using it later.
Some of mine was sewn to panels of fabric, so the side arm panels were removed during this step as well on my project.
Here you can see the batting and the tacks that held some of the original fabric down. These tacks were hidden by the cording.
- Remove fabric panels & buttons.
Again, keep the integrity as much as possible, as you'll need to use these as your pattern pieces when you put your new fabric on.
Make sure to keep your pieces organized, as well, so you remember where they go when you have to put this back together. I typically fold each piece and lay them out the way they came off, having a "back" and "front" pile, left-most pieces at the bottom, right-most pieces at the top.
Here you can see the supporting fabric that lays underneath the batting. This gives the settee extra shape and support.

- Remove any batting, foam, or other seating "puff." Evaluate whether it needs to be replaced or supplemented.
This is usually the easiest step. Mine was the most difficult because it was so intertwined with Step 3 in some spots that I had to combine these steps into one massive fabric fight. Not the most fun, but it got done.
You may come across several different kinds of "puff."
Cotton batting is usually used to smooth out button dips, create curved edges, and add just a tiny bit of extra cushion. For some strange reason, mine also had this prickly corse hair like material stuffed inside some of the batted sections.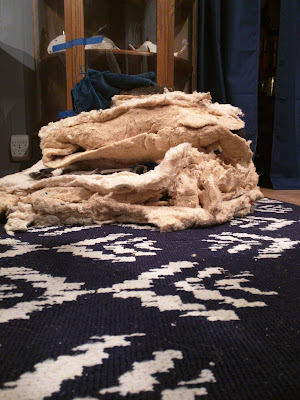
Foam is usually the bulk of a cushion, and may need to be fully replaced if in bad repair. If your foam is crumbling, or significantly torn/stained, I recommend replacing it. It's expensive at first, but well worth the investment if you plan on keeping the piece long term. Luckily my piece did not have any foam.
Springs are a whole different ball game. Luckily, I had a big spring panel I could remove as a whole piece, but most spring loaded seats are connected directly to the frame, and may need extensive repair. I haven't ever needed to do such, but YouTube has plenty of tutorials.
Here you can see how the batting was stuffed all around the spring unit to keep the front of the settee nice and curved, with the extra padding on top for the cushion.
And here is what the spring unit looked like when removed from the piece.
- Examine any burlap strapping or frame covers. If they're in bad repair, replace them. If they just need to be re-secured, bust out your staple or nail gun and make sure they're nice and taut against the wood. These are often used for support for the cushions or shape of the piece, so while they look relatively pointless, they're actually very important!
The top left curve needed some new staples, but luckily that was it.
- Remove any excess staples or tacks along the frame.
You don't want to leave these here so that they can get in the way later when you're applying your own fabric. Kick them to the curb so that you don't accidentally try to tack/staple over an existing piece of metal.


Alright, now that your frame is pretty much naked, you can take a break before moving on to:
Part 2- Cleaning and updating the frame (coming soon)!


Comments
Post a Comment