Bassett Gala Desk
I saw this mid century desk listed on Facebook Marketplace for $25 & loved its simple shape & lines. I knew people would jump fast, and I had a few days before payday, so I offered $40 if they were willing to hold it for me until the weekend. The guy accepted my offer, and I picked her up, sight unseen, that Saturday. After some research I found out it was a 1968 Bassett Gala desk, and that, while it looked rough now, it was worth saving.
This thing had issues. Not just "a few dents & scratches" issues, but structural issues compounded by the previous owner's attempts to keep it standing (but ruining the integrity of the design). The front left leg was wobbly, and they had attempted to secure it using an insane amount of wood glue & a 3" construction screw; problem was that even though that made it less wobbly, it was now crooked & you could see the screw head in the front, defeating the seamless look of the desk...and it was still wobbly 😆

They also had two nails in the top of the front right leg, and two screws in the back right leg leading into the side support bar. Basically, there was a lot of hardware you could see that was never supposed to be there. Luckily, the laminate top was pretty alright, except for the back left corner, but I wasn't too worried about that.

Things I had to do to get the desk in working order:
It's still far from perfect, but it's a lot better off than it was! I've got to figure out how to even out the color between the frame and the drawers at some point, but I don't totally hate the contrast.

Now I have the perfect spot to store all of my refinishing tools that otherwise have always just kind of "floated around." This little desk will hide in the basement alongside all of my paints, stains, and sealants while it hides away my spare sanding disks, stirring sticks, can openers, gloves, masks, extension cords....you get the idea.

This thing had issues. Not just "a few dents & scratches" issues, but structural issues compounded by the previous owner's attempts to keep it standing (but ruining the integrity of the design). The front left leg was wobbly, and they had attempted to secure it using an insane amount of wood glue & a 3" construction screw; problem was that even though that made it less wobbly, it was now crooked & you could see the screw head in the front, defeating the seamless look of the desk...and it was still wobbly 😆

They also had two nails in the top of the front right leg, and two screws in the back right leg leading into the side support bar. Basically, there was a lot of hardware you could see that was never supposed to be there. Luckily, the laminate top was pretty alright, except for the back left corner, but I wasn't too worried about that.

Things I had to do to get the desk in working order:
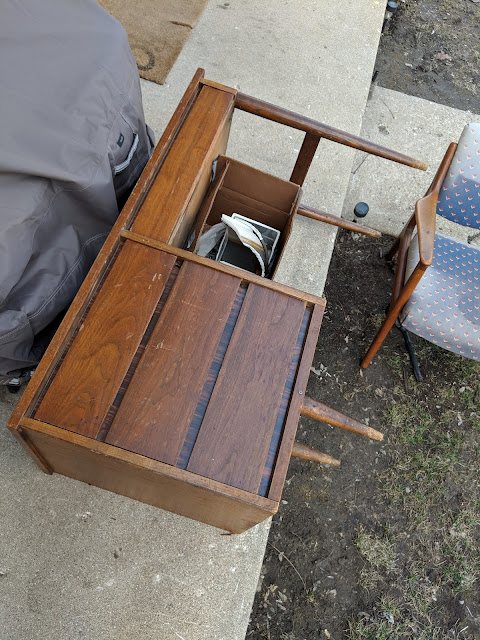
- Stabilize the front left leg. Since this leg was under the drawers, it had a lot of weight on it. The new screw someone had installed had caused the leg to sit crooked, where the bottom of the leg was facing inwards, towards the back of the desk. It's hard to tell in this photo, but when it was standing, it was painfully clear.

I had to remove the screw & excess glue, re-set the leg straight, and add some wooden slats between the leg and drawer casing to keep it in a fully upright position. I then had to reinstall the original hardware from the back of the leg into the frame & use glue to hold it all together.
- Stabilize the front right leg & support bar. This portion held up the entire right side of the desk. Without it, the desk wanted to fall forward due to the weight of the drawers, I knew it had to be super secure. I removed the 5" long nails from the top of the leg, and the 3" construction screws form the back of the support bar.
I also scraped away as much of the excess glue I could from the support bar notch & discovered that there had originally been a pocket hole screw securing the bar to the back right leg, but that the portion of the bar that would normally fit into the notch had been broken off. I filled the notch (and unnecessary holes created by the nails & screws) with wood putty & sanded down all of the pieces.I then secured the front right leg to the desk using a bit of wood glue between the leg & desk, and installed new screws in the original hardware holes from the inside of the drawer casing. I then used a bar clamp to keep the leg flush with the desk while I attached the support bar & the glue dried. To attach the support bar, I used a bit of wood glue on the end of the bar that had been broken & lined it up to the now filled notch. I secured this with another bar clamp spanning the entire support bar, to make sure it stayed tight across the entire depth of the desk, and installed a new screw in the existing pocket hole.
I let everything dry for 24 hours before standing the desk upright.


- Stabilize the drawers. Several drawers had started to have the dovetail joints come apart, and so I filled the joints with wood glue, malleted the joints back together, and used bar clamps for 24 hours to allow plenty of time for the glue to dry & for the joints to be like new again.


- Reinstalled the back panel. The drawer casing had a thin board attached to the back that had been torn at some point, and the original nails were falling out all over the place. I replaced the nails with some brad nails I had on hand, and realigned the tear so that it sat flush against itself. No one will see the back of this piece, so I wasn't worried about replacing the panel.
- Sanded down to the naked wood. Once the drawers were stable, I sanded down the fronts of them using my Mouse, working from 80 to 120 to 220 grit sanding disks. Then I worked on the frame until everything was buttery smooth.


- Cleaned the drawers. I don't know what they used to have in this thing, but the contact paper inside was nasty. I couldn't get the contact paper up from the righthand drawer, so that will eventually be replaced. But for now, I just put some baking soda in them to get out the musty smell & let them sit in the sun for a while.


It's still far from perfect, but it's a lot better off than it was! I've got to figure out how to even out the color between the frame and the drawers at some point, but I don't totally hate the contrast.

Now I have the perfect spot to store all of my refinishing tools that otherwise have always just kind of "floated around." This little desk will hide in the basement alongside all of my paints, stains, and sealants while it hides away my spare sanding disks, stirring sticks, can openers, gloves, masks, extension cords....you get the idea.


Comments
Post a Comment